DAY 7?: Grilled Pizzas

Ok, so “daily” might be a tad bit extreme for this Make Stuff Up Challenge. I mean, I actually did spend a shit load of time making stuff over the last few days but it’s so completely boring that I couldn’t really write an entire blog post about it. I made 350 gift certificates for the school auction. Right? Snore fest, I get it. How about some grilled pizzas instead?

(On a side note, I do plan to pick back up the basement this week. I swear!)

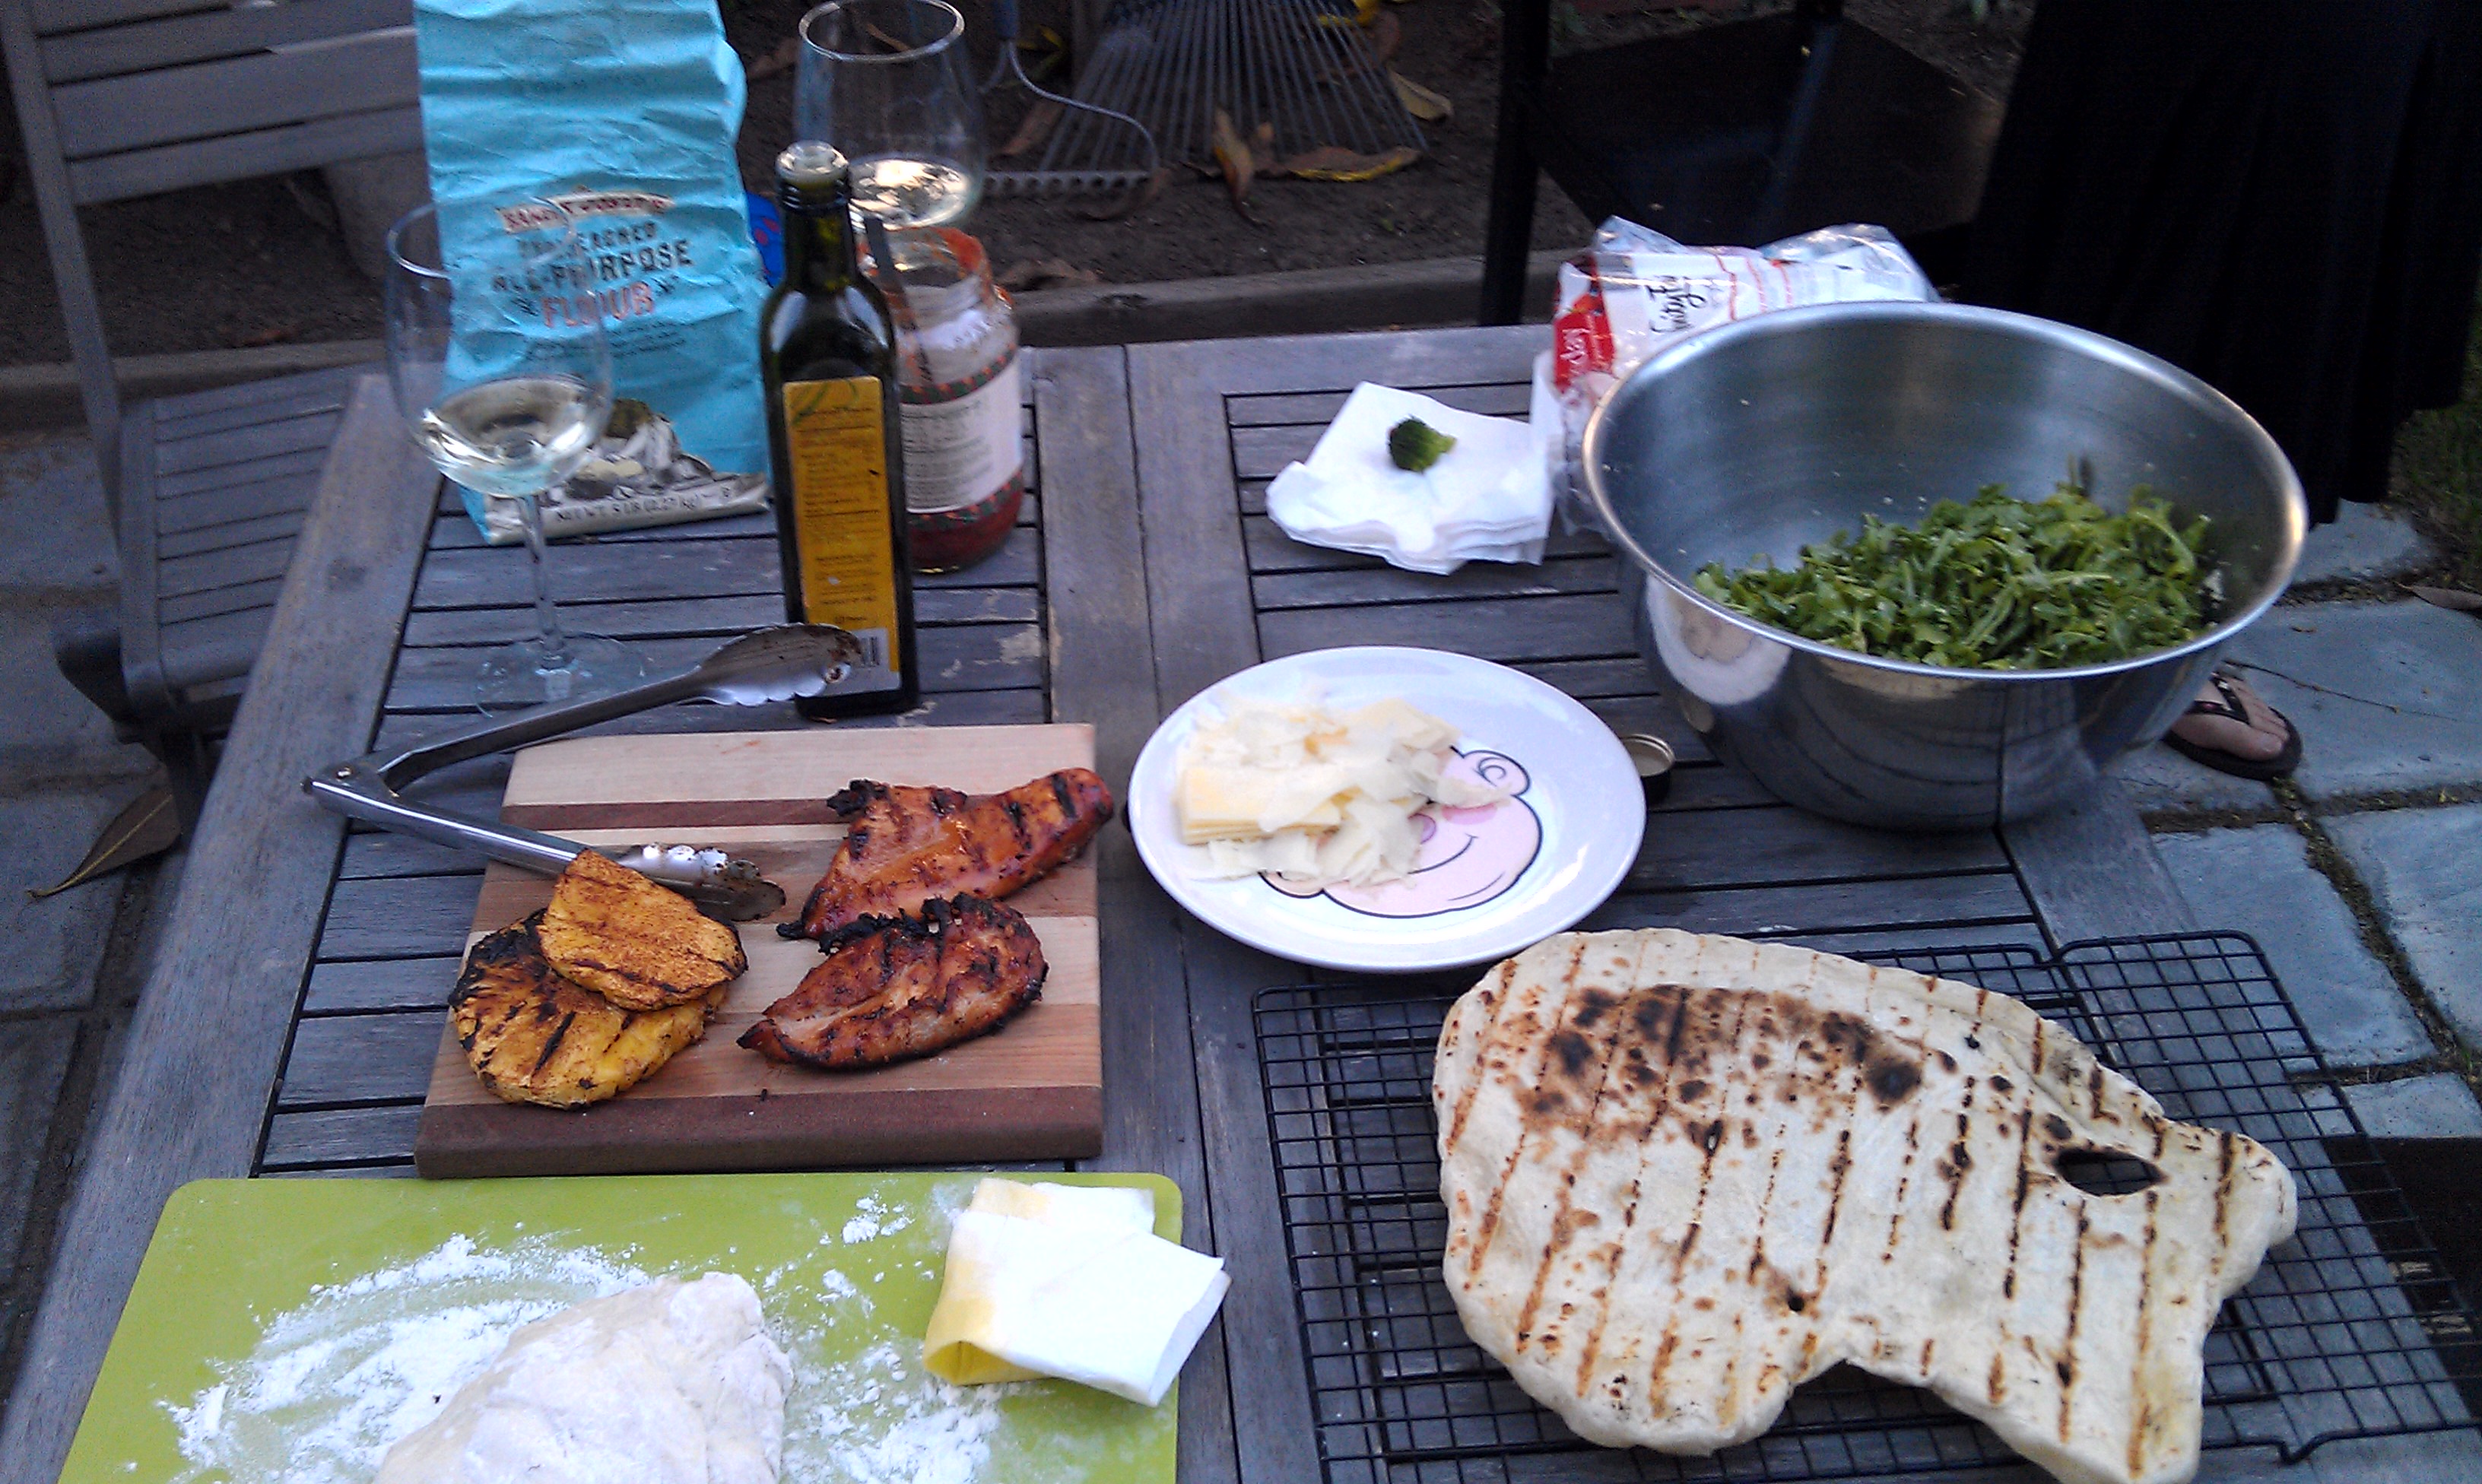
The beautiful weather continues in the bay so I thought I’d invite the neighbors over tonight and make grilled pizzas. It’s ridiculously easy and my favorite method to cook pizza since being introduced to it a few years back.

my mise-en-mess
my mise-en-mess


GRILLED PIZZA DOUGH:

I use Trader Joe’s Pizza Dough. It’s like a buck and it’s better than what I used to make. I know, I know! This Make Stuff Up challenge is about making it if I can, but this stuff is good, cheap, and ready (and what’s a little harmless cheating?)

  • Take dough out of fridge at least an hour prior to cooking
  • Cut the ball in half, flour a surface and roll/stretch it out until it’s pretty thin
  • Rub olive oil on one side of the dough and then transfer it, olive oil side down onto the hot grill. Stretch it out a bit, don’t worry about holes or it being oblong… it’s all good, just call it rustic chic.
  • Grill on Med High, grill closed, for 2-3 mins until it it starts to bubble and crisp up a bit
  • Brush the top with olive oil and then turn over
  • Grill for another 2-3 mins and remove from grill.
  • Repeat for each pizza you want to cook. Doing all the dough first makes it easier.

TIP: Don’t worry if it burns a little here and there, it’s still tasty.

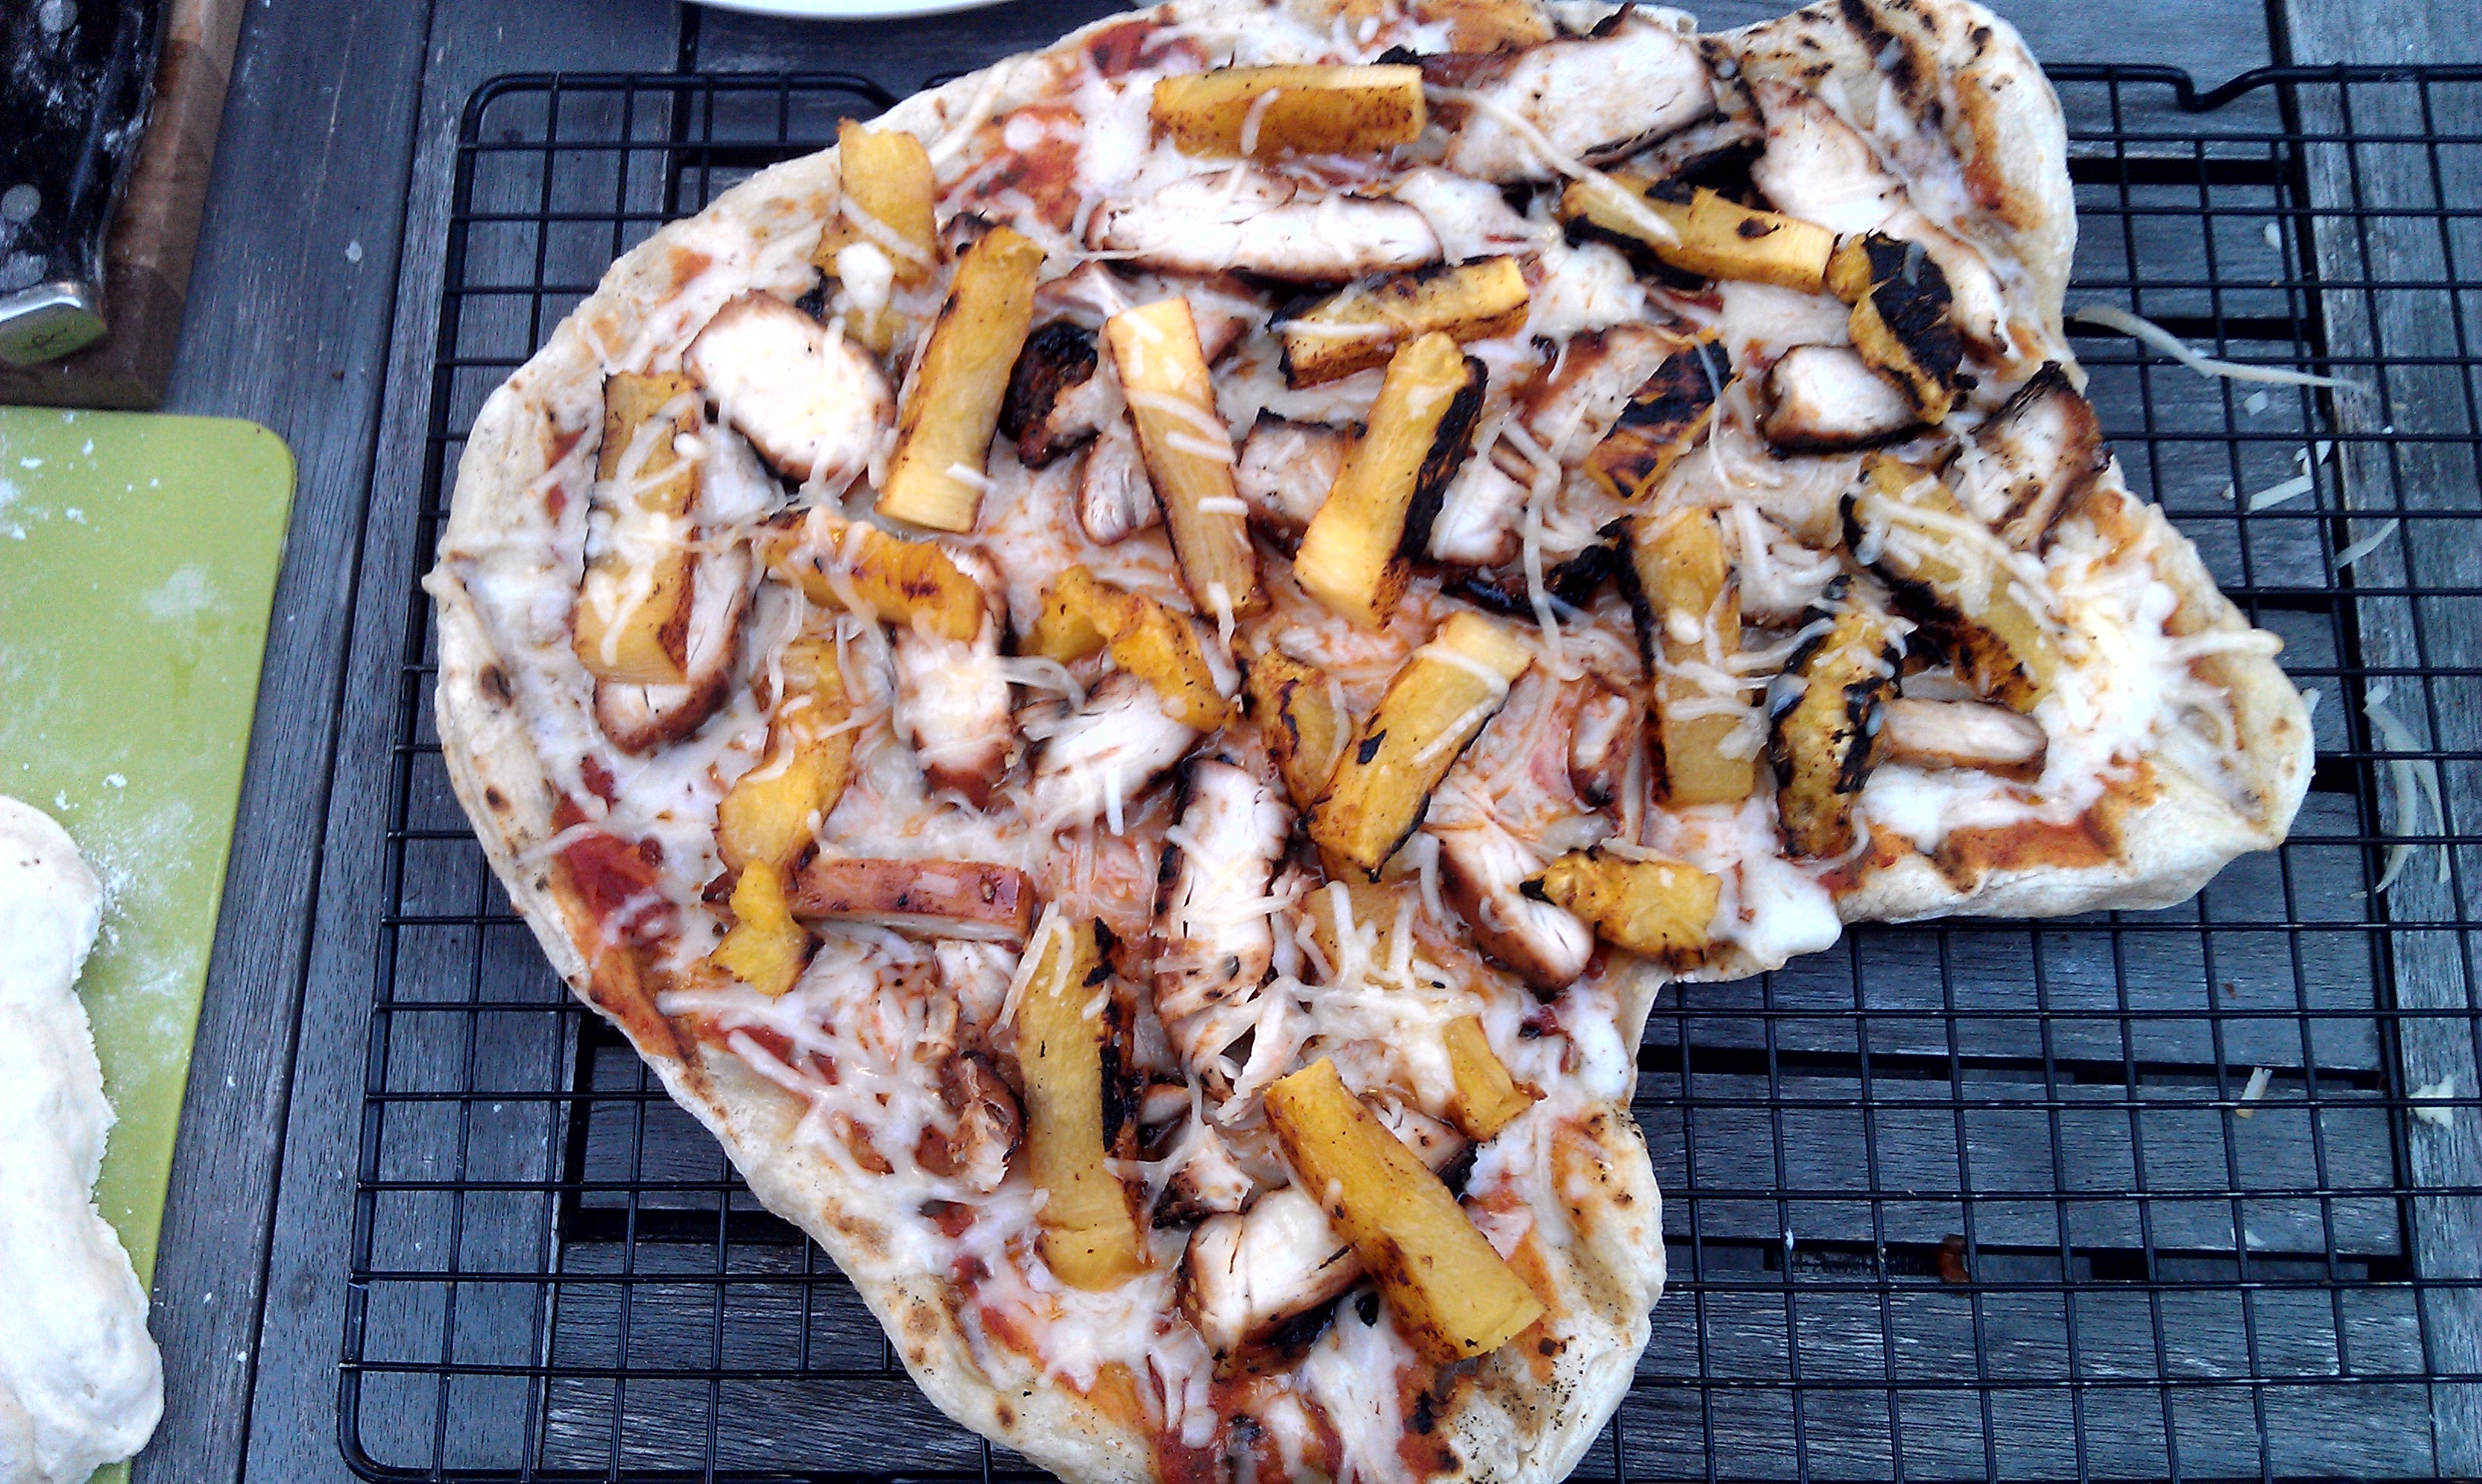
GRILLED PIZZA: PINEAPPLE & CHICKEN
Today’s new grilled pizza creation got a universal thumbs up and will be made again.

Grilled Pizza: Grilled Pineapple, Chicken, Mozzarella Pizza

HOW TO MAKE:

  • CHICKEN: Marinate boneless/skinless chicken breast in Soy Vay (CHEATER!), grill it, pouring extra marinade on chicken during grilling.
  • PINEAPPLE: Slice a pineapple into 1/2 thick circles, sprinkle both sides with Ancho Chile powder & sea salt. Then grill until kinda charred on the outside and soft (approx: 15 mins each side).
  • PIZZA ASSEMBLY: Spread some pizza or pasta sauce (CHEATER!) on the pre-grilled dough. Spread some shredded Mozzarella and Parmesan. Then slice the grilled chicken and pineapple and place on the cheese.
  • COOK PIZZA: place the pizza back on the hot grill, close lid and cook until the cheese is melted.
  • Cut and serve

GRILLED PIZZA: FIG, MANCHEGO, PROSCIUTTO & ARUGULA
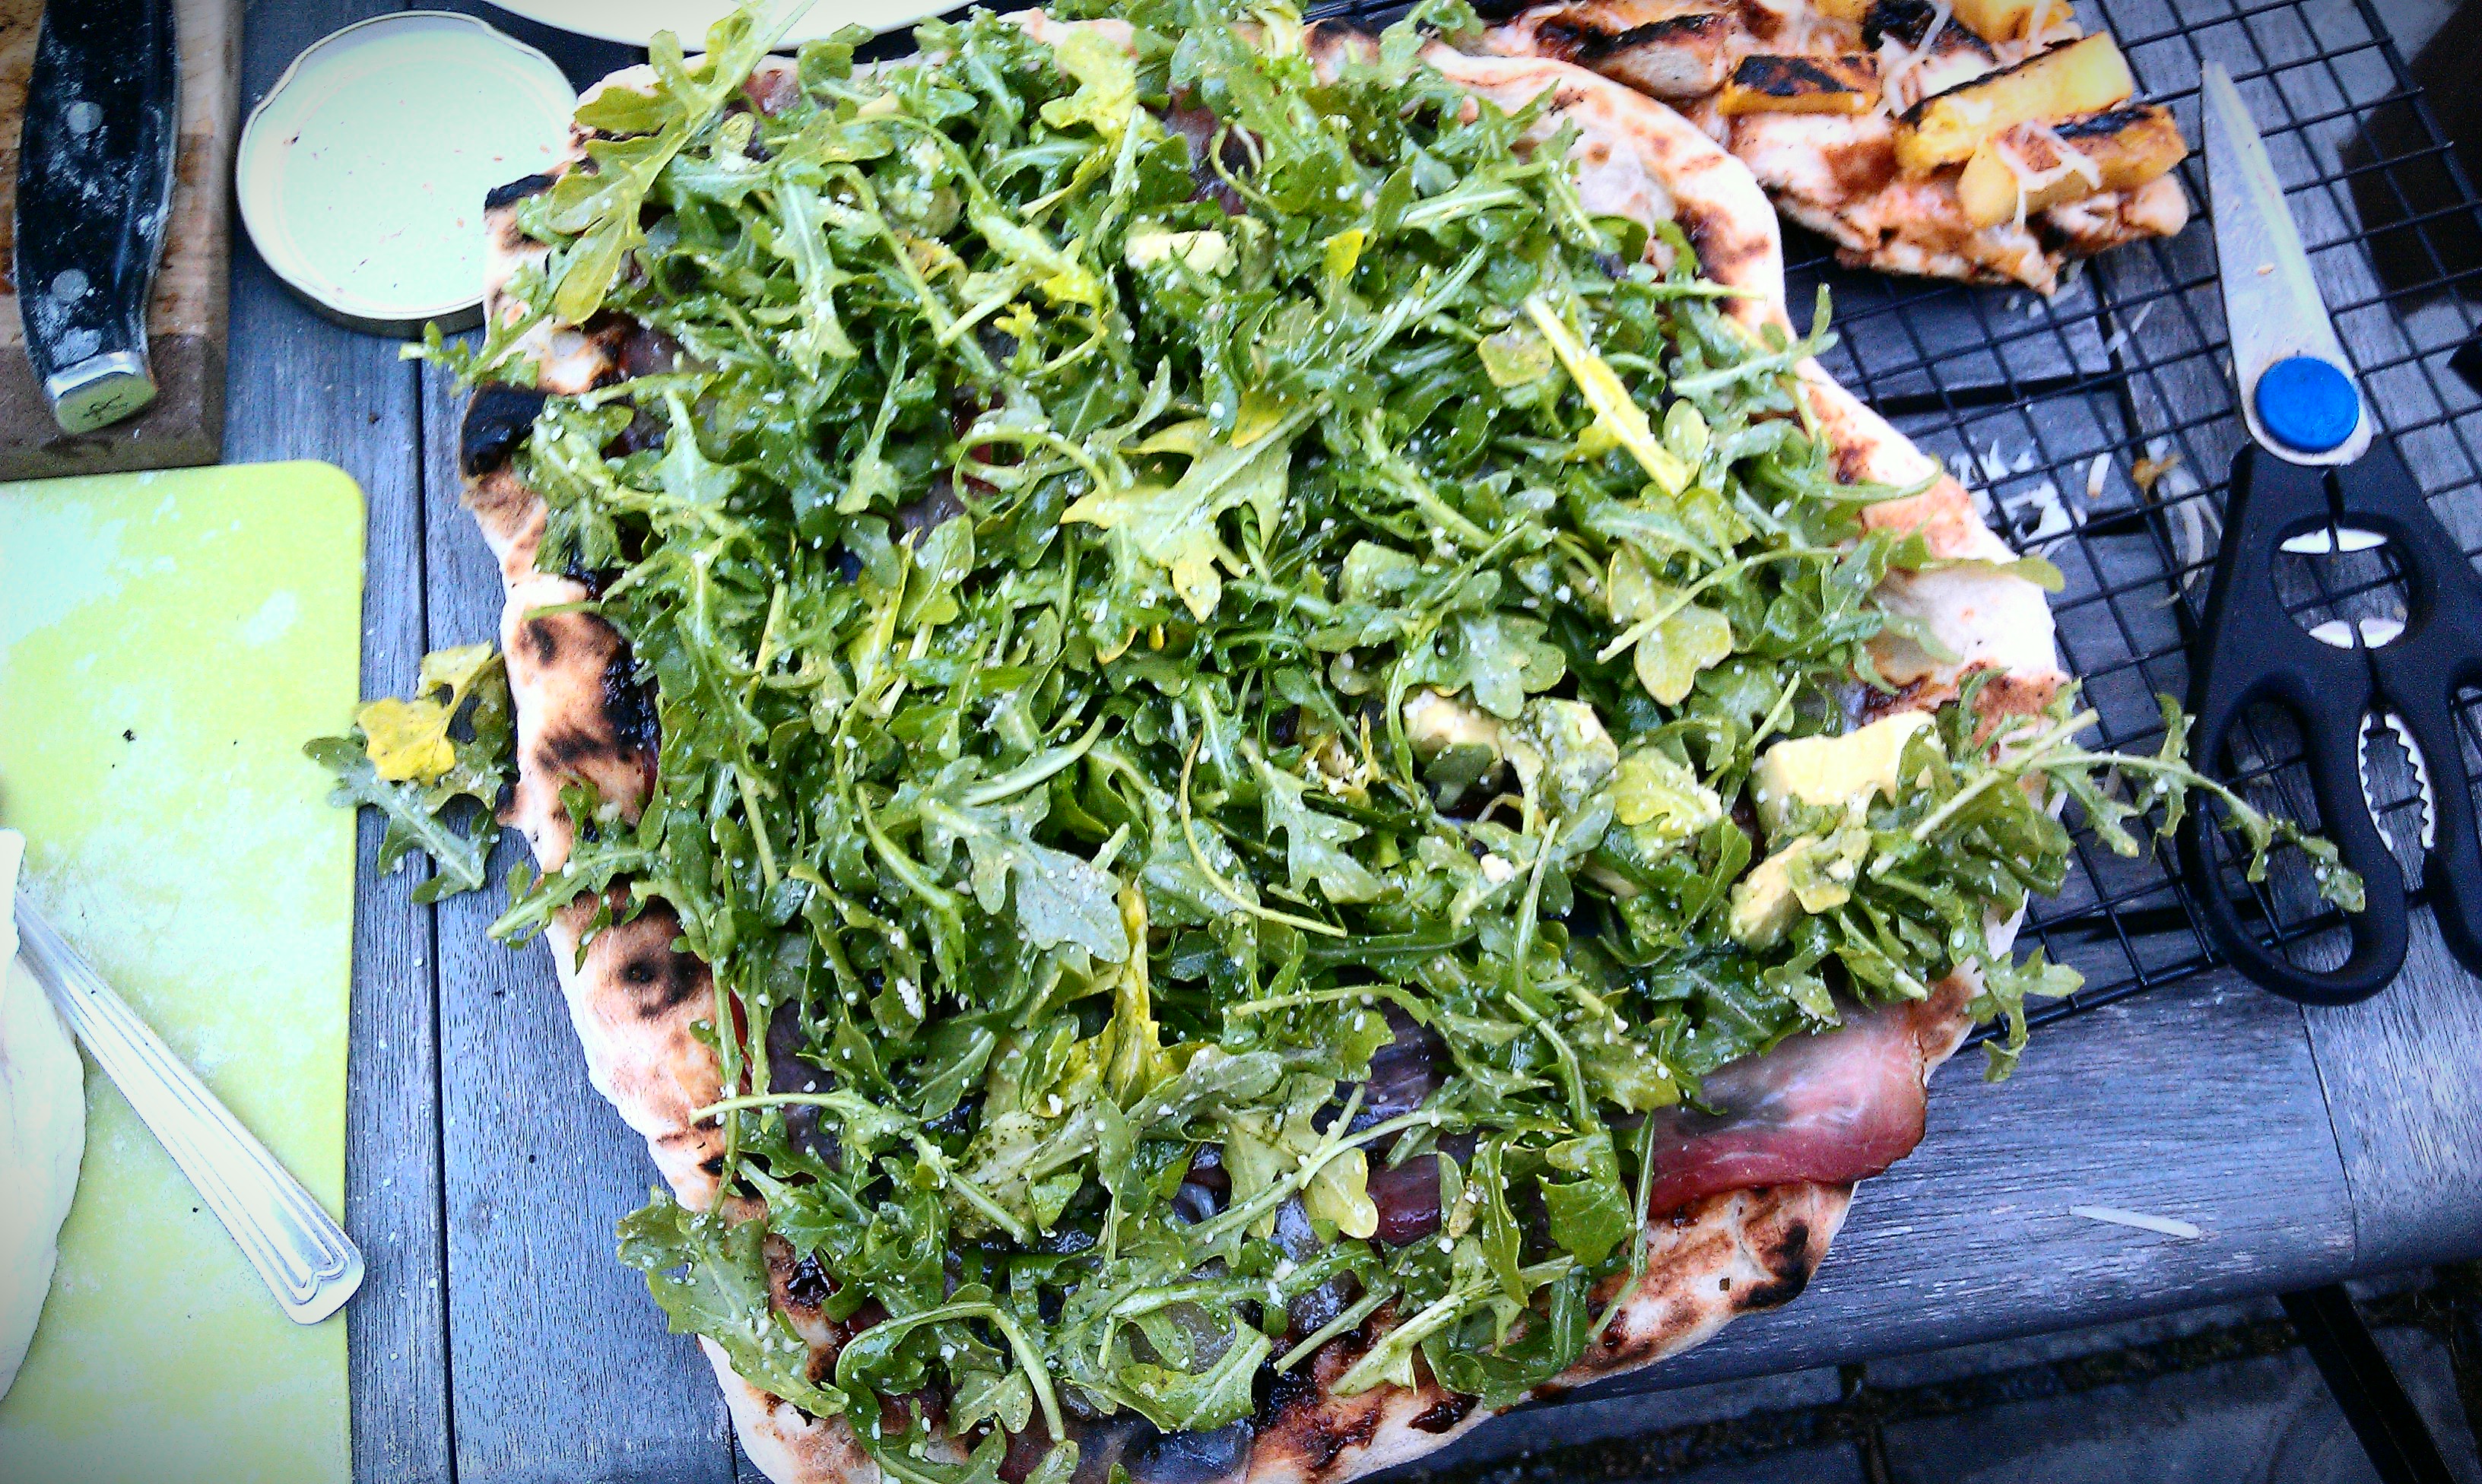
Pizza on the Grill
Pizza on the Grill

HOW TO MAKE:

  • ARUGULA SALAD: Mix Arugula with a little olive oil, lemon juice, grated parmesan, salt, pepper, and cubed avocado. Set aside.
  • FIGS: When figs are in season, slice some, toss with a little olive oil and layer on the pre-grilled dough. When figs are not in season (or when you’re feeling lazy) get Fig Butter (again, Trader Joe’s) and spread a thin layer on the dough.
  • PROSCIUTTO: layer thin slices of prosciutto on top of the figs
  • CHEESE: Thinly slice Manchego, Pecorino, or Parmesan and lay on top of the prosciutto
  • COOK PIZZA: place the pizza back on the hot grill, close lid and cook until the cheese is melted.
  • Take pizza off and place your Arugula salad on top.
  • Cut and serve

This Arugula pizza is a neighborhood favorite and on the crunchy yet chewy grilled pizza dough, it’s addictive.

Seriously, grab some pizza dough and start grilling your own concoctions and please let me know what you make!

DAY 6: It’s Frickin’ Hot: Coffee Ice Cubes & Coffee Popsicles

It’s been hot here in the Bay Area this week. Not pretend Bay Area “hot” but actual, legitimate hot. It was 88 yesterday which, for April, is hot. AND I think from my 1 min of internet research it was possibly one of the hottest temps in the country yesterday. maybe.

Well, even on hot days I require copious amounts of coffee to run my daily routine. It’s kinda like a drip line… I brew a large pot and just chip away at it throughout the day. Lukewarm? Whatevs, it works.

On our trip to Santa Cruz last weekend, we visited our friends who recently moved from Kenya to Santa Cruz to work for Verve Coffee Roasters. Lucky us, they gave us a bag of beans to take home and try.

So…
heat + bag of beans = iced coffee experiments

No more watered down Iced coffee.
EXPERIMENT 1: COFFEE ICE CUBES
Well this is one of those DUH, why haven’t I done this before kinda moments. Monday at the school coffee cart, one eager coffee cart volunteer went above and beyond with a cooler full of these to plunk into your coffee. Brilliant.

I brewed a pot of coffee, let it cool, then poured most into a plastic container and froze it overnight. I chilled the rest in a carafe in the fridge.

An ice cube tray would have been easier but I have a fridge that makes ice so I don’t even own a tray. I didn’t think it really mattered until I tried cutting the large frozen coffee brick down to cubes. Warming up the knife with hot water helped but I did end up with a bloody knuckle. Use a tray if you have one.

Then I just filled a jar with large coffee ice chunks, some soy creamer, and some cold coffee. So good, all the way until the end. No watered down effect with these cubes.

TIP: Mason jars with the lid make great travel mugs for iced coffee and other beverages.

EXPERIMENT 2: COFFEE POPSICLES

Coffee Vanilla Soy Creamer popsicles

Like I said, it’s a constant drip-line so why not amp it up a bit for the 4PM installment with a delicious Coffee Vanilla Soy Creamer popsicle.

You will need:
– Coffee, ideally refrigerated
– Trader Joe’s Soy Creamer, milk, creamer, Bailey’s? (hmm, would it freeze?)
– Small amount of Vanilla to add to creamer
– Popsicle makers

Then just fill each with 1/3 coffee and freeze. Then add 1/3 creamer and freeze, then fill remainder with coffee and freeze. Pull it out and eat it. Easy!

I fumbled a bit in the concept, I wanted three layers: layer 1 coffee, layer 2 soy creamer, layer 3 coffee. Sharp Martha-percise lines. BUT, this requires you to have patience…I lack this. So rather than wait for each layer to freeze before pouring the next, I let them semi-freeze. It actually kinda worked better in the end. It didn’t have the same crisp brown and white lines I was hoping for, but it tasted really good mixed up together. Coffee and cream in each lick.

Both frozen coffee experiments were a success. I’ll stick with the cubes regularly and make the popsicles occasionally.

DAY 5: FAIRY CROWNS

Fairy Headband on Elise

We rolled back into town yesterday from Santa Cruz, haggard and sandy, about an hour before a neighborhood birthday party. I think they said no gifts but in my head that equates to “small, less permanent gift” (i.e. we don’t need any more plastic crap in our house)

Pre-Make Stuff Up I might have grabbed an ice cream coupon, some taco scratch n sniff stickers, or a small book. But, if I CAN make something, I SHOULD make something.

So I rounded up some left over party supplies et voila!

These are super fast to make, and make really great party favors!


HOW TO MAKE FAIRY CROWNS

Stuff to make fairy headband. easy.

    You will need:

  • Beaded necklace
  • Curling ribbon
  • Wire Garland
  • Scissors


STEP 1: PREP (My fave!)

  • Necklace: Cut the string between two of the beads so that you have one long strand of beads
  • Curling Ribbon: Cut a bunch of 4ft pieces of curling ribbon. There’s no magic number, I think I had around 25 pieces
  • Wire Garland: Cut a 4ft piece of wire garland

STEP 2: ASSEMBLE HEADBAND/CROWN

Twist the wire garland and beads together.

  • Anchor the wire garland and necklace together by wrappimg the wire garland around tightly in the space between the last two beads of one end of the strand.
  • Next wrap the wire garland around the beaded strand so that they are intertwined. It helps to wrap the wire in the spaces between every 10th or so bead to make it more “solid.”
  • Once you have about 2-3 ft of this garland/bead “twist”, grab a kid and use their head for sizing. (TIP: It’s best to err on the larger side because you can always twist to tighten the final product).
  • When you have the right size, cut off the extra beads and wrap some of the wire garland tightly around the end of the beads. Then hold the two sides of the necklace together and continue to wrap the wire garland around the end beads, joining them together into a circle.
  • Make a loop in the end for the ribbon.
    Make a loop in the end for the ribbon.
  • Make a little loop on the end with the wire for your ribbon. (see pic)
  • Either cut the wire now or, if you have a lot of wire garland left, wrap it back around the beads another time for extra sparkle.


STEP 3: RIBBONS

  • Gather the ends of all your cut ribbon and thread them through the loop.
  • Twist the loop repeatedly until it’s tightly holding the ribbons in place.
  • Take the scissors and curl each ribbon.

 
DONE!
(and seriously, these steps probably make it sound complicated. It’s going to take you less time to make one of these than it took to read this page).

Fairy Headband
Fairy Headband

                                                                                    
UPDATE: 4th of July Crowns
We have a very quaint 4th of July parade in town that passes a mere half block from my house. This year I made a bunch of these fairy crowns in red/white/blue for all the neighborhood kids to wear to the parade.

4th of July Fairy Crowns

DAYS 3 & 4: Busy Making Nothing.

Well, kinda dropped the ball on this daily Make Stuff Up challenge. Fumble, fumble.

Revised Challenge Rules:
Every Day.*
Make.
Something.

*Except when it’s super nice out and Santa Cruz is calling…

…AND also especially when Santa Cruz just became the new home of your very good (very pregnant!) friends who have lived abroad for the last 13 years.

Lovely day at the beach. Santa Cruz

It was an awesome getaway and reunion full of creativity in its own way.

There was one particularly lovely moment I don’t want to forget. Ellie and I had been chasing waves up and down the beach and we were late to meet everyone for dinner when she asked to sit. I dropped the agenda and just sat. She reclined out on me, head resting on my shoulder, towel covering us both and we just rested there, watching the waves and the sun hanging low. She was so still for a 4 year old. Chatting, cozy, and together.

Love.

DAY 2: What Basement? Today: Kid Art and Cookies

For today’s “make” challenge I set aside the dust mask for some art curating and cookie making.

ART SHOW
Today was all about prepping for tonight’s big art show at Jack’s school: Art a la Mode. Which I kinda think means art with a ice cream on top but ok, whatever.

Jack's paper collage self portrait.
Jack’s paper collage self portrait.

Backstory: I do THE most fun volunteer gig at Jack’s school, Art Docent. Once a month I go into his Kindergarten class, teach the kids about art history and elements of art, and do a corresponding project with them. We’ve done cave art, stamp/print making, portraits, Matisse replicas, and so on. Super fun.

Well, with the annual Otis art show closing in, things have been heating up on the local kid art scene. Lucky for me, I recently quit my job. It takes a crap load of time to curate this stuff.

So I spent today creating the class display/puzzle. It went a little like this: layout art, pin it up, move art, move more art, remove, move again, move up, move down. done? No. repeat.

Then I volunteered to help another parent with her layout, pin up, move art, move more art, remove art, move again, move up, move down. done? No. repeat.

In the end, it was all worth it to see the kids filing in tonight, parents in tow, zeroing in on their art with pride (and then poof, off to find the “a la mode” part).

Ms. Whitman's Kindergarten class art
Ms. Whitman’s Kindergarten class art

COOKIE MAKING
(psst, a little thing about me: while I am not working I bank up all the uber-mom points I can, while I can…)

So, another thing I made today: Carrot Cake Sandwich Cookies for the art show bake sale.

So good they hurt.
So good they hurt.

So who better to tap for a bake sale hit than Martha?

Really, you should make these cookies. They are easy, they are good. So good that when I make them I double the batch because, over time, I have created too many addicts to support with one batch. That good.

It actually does hurt a little after eating them. I think because they are stuffed with a butter/cream cheese/sugar frosting equal to your weekly caloric intake.

DAY 1: Prep = 80% of the work, 0% of the fun

Alright! Let’s get this “Make Stuff Up” Challenge going.

I’m super psyched and ready to…

PREP.

UGH.

Ok, so yeah, maybe this isn’t the most exciting way to kick off my creative challenge but this basement project has been hanging over my head for awhile so let’s start big. Truth be told, the real shout out should go to my husband Mike who did 99% of the work on this basement with new walls, trim, ceiling, doors, etc. It’s been 2 years of chipping away between work, family, and poker commitments and now it’s my turn to finish it off.

me in my prep gear
Me looking super hot, jealous? Who wouldn’t be?

GOAL: Make the basement into a playroom.
MY PROJECTS: Prep, paint, decorate.
TODAY’S GOAL: Sand, wash walls, tape for painting

Ok, so I do a lot of small scale stuff… painting, crafts, the occasional baked good, etc. so truthfully I am a little intimidated by the scale of these larger construction projects. I know I can do it but I won’t lie, it does place a challenge on my attention span. Seriously, everything takes 4 times longer than it really should.

Case in point: today’s project.

BEFORE

Basement Before Prep

AFTER

Basement After Day 1 Prep

Yep, I know… I hear your collective WOW! It really bowls you over doesn’t it? I mean, how could one possibly effect so much change in such a short amount of time? Well my friends, it took focus.

This is what I mean about scale, 4 hours and the visual change is so dang boring! It kinda looks like it took me 4 hours to put up 20ft of painters tape. But I promise there was more involved…

Sanding
I started with “roughing up” the paint on the trim and yellow poles in the middle of the room as painting prep. My plan is to cover those ugly poles so, in hindsight, I am regretting taking the time to sand them. Especially as I sit here tonight hacking up freaky lung stuff. I don’t think those little dust masks work well. Anyhow, lesson learned… paint over things like this. Who cares how it looks if you’re going to find a creative way to cover it in the end with fabric. Plus, it’s the basement!

Sweeping/Vacuuming
Yep, pretty much how it sounds. Dust + Dirt = Shop Vac

Wash Down all Walls
Again, not much more needs to be said about washing down walls. Tip: Great task for all those old cloth diapers we pretended to use.

Blue Tape
Ok, strategy time. Where to tape? I will be doing primer next and the concrete uses a different primer than the walls and wood so that’s where I drew my blue line.

And that’s it. 4 hours. And you could literally play a Daily Diff with the before and after pictures.

But it’s progress.
Here’s the start of the design phase: My Playroom Inspiration Pinboard on Pinterest

NEXT UP: More prep, primer, paint.

Make Stuff Up Challenge

I am launching this creative challenge for myself: Make something every day. Make Stuff Up. If I can make it, have the time to make it, then I make it. You get the idea.

Blogging about it will hopefully keep me to it. Maybe share some learnings, get some good feedback, but basically make myself accountable to, well, myself.

Every Day.

Make.

Something.

Speaking of, this is our blue house where most of this will go down:

Our little blue house.